What is a three railer?
Model Rail Road O Scale (1:48) that has three rail tracks the toy train runs on, with the middle rail supplying power to train. The two out side rails are the no-load neutral. Joshua Lionel came up with the design before WWII, is uses low voltage AC current. (HO scale has two rails and run on DC current)
- The more recent two rail O Scale modeling is new and more realistic. But it has high expense and higher price tags generally, due to model wanting to be more realistic. (these are not toys..)
How I got started
Growing up as a young child had a Marx O scale set that was very durable (lots crashed with plastic solders), later expanded into a two Lionel trains sets. Having the initial Marx set was rough with limited expansion option with Lionel cars (Y connection couples), just the tin track and village stations/builds were shared between the brands.
Later I purchased two Lionel sets on mid 1970 that had limited features. Nagging questions the the Lionel sets quality created in late 1970, they generally had limited features for a high price. Lionel factories were moved to US mid-west with high cost labors. My view was that Lionel entry slide of the O scale market was dropped and its focuses was on high end high priced sets. {away from toys over to collectible status}
I was able to go to local train stores and pick some high end freight cars with metal wheels and full operating couples. For the first time I was able to see all high end premium engines in the store listed for approx. $200, what kid can afford that. With paper route money I would go to the train hobby shop every six to nine months with my mom (dad was not big fan).
Initial Childhood Layout (pike)
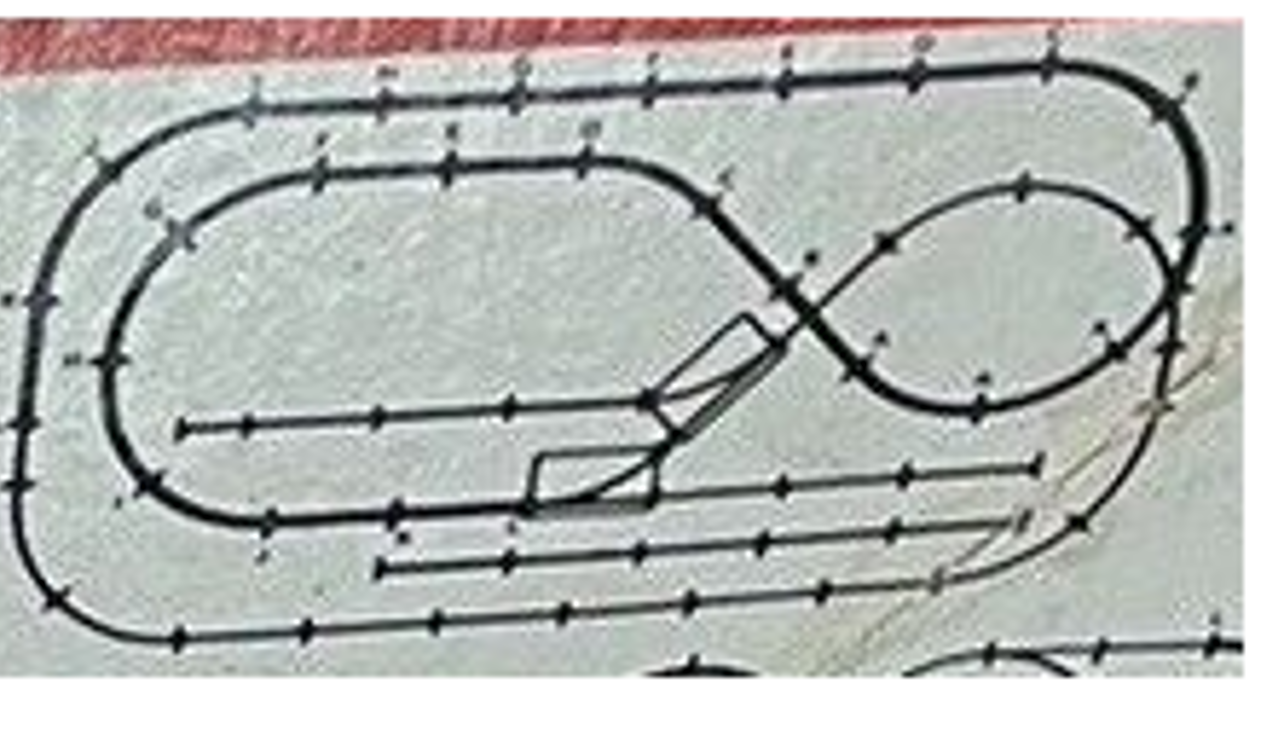
In middle school years, I was able to build a 4 x 8 set in middle school that sat on a ping-pong table. I used the modified figure eight Lionel layout that was on the trestle box ( pic below ). There were limitations on which trains/consist could dependably climb up the incline. I was able to used wood/ chicken wire and paper mache to build mountains on one part of the layout. I did gain skills on wiring and the need to power switches separately away from track power ( false change in engine direction with power spikes)
** Trestle Layout on box
Post College
While on Ebay back in the late 1990's I was looking through the various listings. The train collect collection section was found and and I was amazed at the large toy train listings present. It was like whole train hobby shop with both new and old items. I was able to see all of my childhood collection in one night, all inventory came to approx. $450 in value. I was quite insulted but was glad to see some items and some memories came back. {Trains were packed in parents house attic for many years.}
Building a Collection
I started to collect items while living in Hoboken in an apartment, had items shipped to parent house for Ebay auctions. My general rule was $60 a week spent on items, most of the fun was winning auction for the lowest price. At that time on Ebay you could lookup who was bidding and the other items that person was bidding on. It quickly became apparent those sellers who were colluding and driving up prices artificially (shilling bidding). I just stayed away from those organized sellers and their listed items, mostly looked for sellers who wanted to empty an old attic. . In addition, finding folks that were bidding on common items, open the path for similar low cost items.
Items Collected - Post Modern ( 60s-90s Northeast flags)
*** I have limited interest in steam power, mostly diesel
- Conrail
- Amtrak
- LIRR
- NJ Transit
- Erie Lackawanna
- Susquehanna
- NS
- CSX
- D&H - TBD, no items collected
{I need to buy only rolling stock that runs on 054 curves and 042 curves, cannot fit 072 curves in my space. MTH RailKing and 027 Lionel coaches are fine by me.}
Second Layout Design
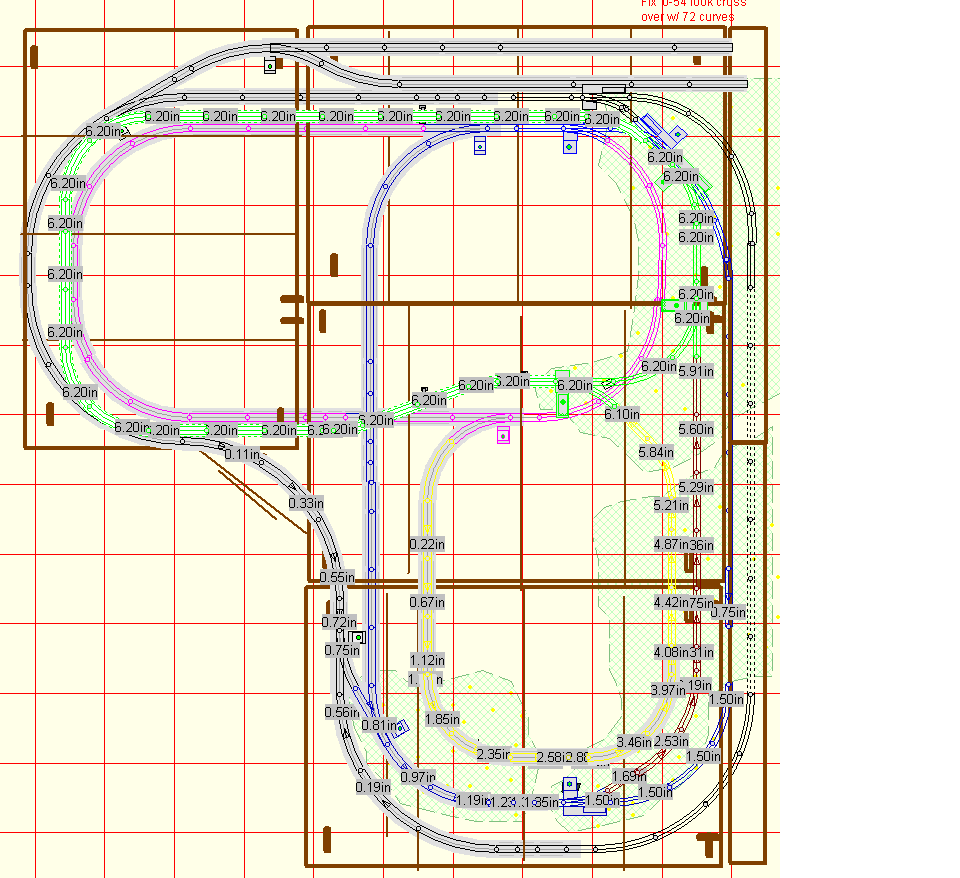
After reading multiple journals and magazines, here is the layout designed (10 ft x 12 ft) with three/four loops and an incline to reach all the tracks. I used the RR Tracks software to fit the layout into the desired foot print size and calculate the inclines.
- Tracks black, blue, pink and green (elevated 6.2 inches) are the main running loops
- Tracks yellow and maroon are the incline
- Designed with minimal switches to reduce train issues
Second Layout Details (RR Track software)
There are a few packages out there to design on layout, I chose the RR-Tracks software and paid a few bucks . I needed to fit into a 10x12 ft and wanted bench-work that could be broken down and stored in attic. Wanted to see what could be fit into that space and simplified loops design with only 3 turnout per-running loop. Also nice to have the multiple MTH and Plastiville module added to software for the 3D model render feature. (It's just toys, but nice to get some details right and reduce guess work)
Bench Work Design
- Used 1"x4" lumber with 1/2 plywood, from the hobby books found out there is no need for the heavy 2x4 .( My tables can support a person )
- Created four 4'x6' tables connected together for a simple modular design with brake-down and storage in mind. ( w/ extension possible in future )
- Used second overlapping layer of 1/2 plywood sheets for mountain and landscape roads, grass setup, they are stored separately. (jig saw used to cut)

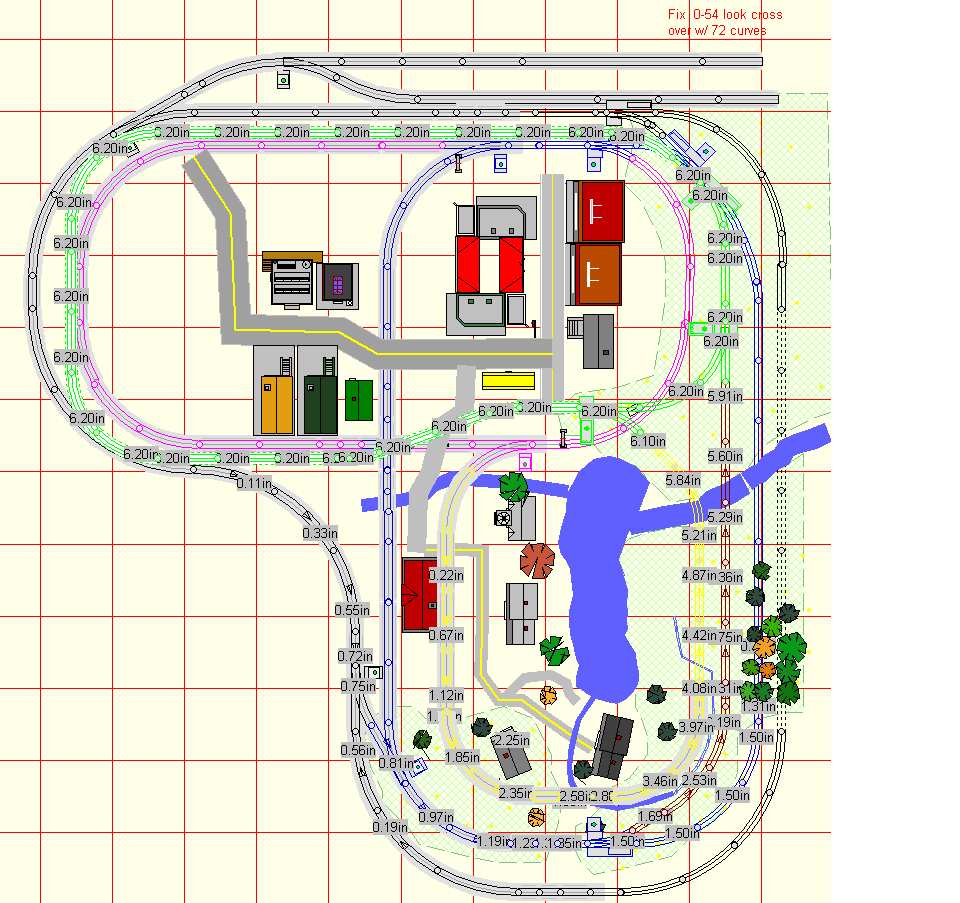
Layout with buildings, mountains and lake added
- Used the extra modules to fix all the details here, both the plasticville and MTH buildings modules was a must
- Able to keep inventory on what builds/accessories were needed (fyi..each eBay win was a village redesign)

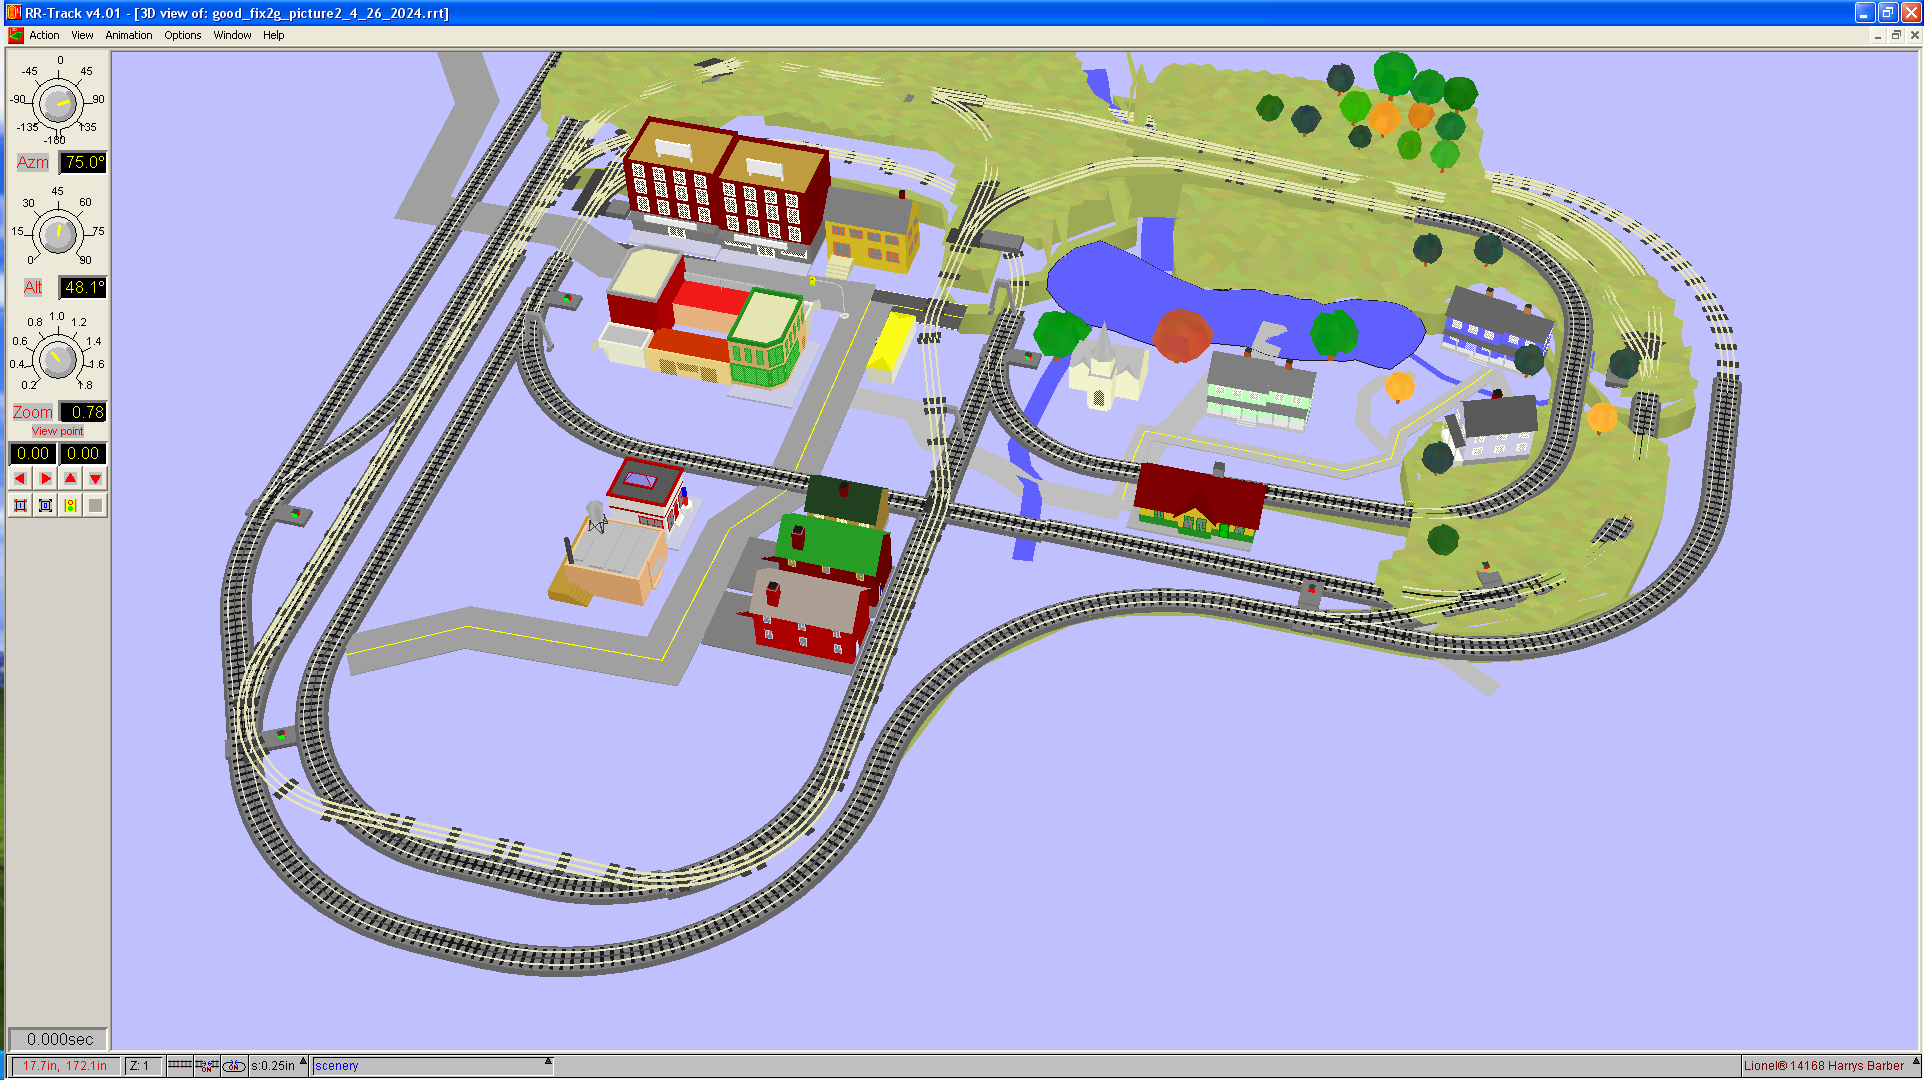
Low Angle Level 3D view
- It took some time to get working and buildings correct with mountain/tree heights valid
- I rather do revision in the model then have guess work at layout build time (been there, not fun, purchased items do not fit)
High Angle Level 3D view
- Can you get terrain transition to make sense or somewhat realistic ( not a tinplate/toy fan)

So was it ever actually built, you bet!! (see videos below)
These are two video clips of my working second pike build, created the same time. (ie: same trains running)
- Layout was 60%-65% done before packup/storge.
- Country lake, rural houses and mountains are mostly complete
- City village and industrial area only 15% done ( ran out of time )
- More work was needed in city and industrial areas
- One can see the new upper rail yard off Green loop at back of mountains that was added during construction ( confusing for RR-Track software )
- Upper Green loop was going to be an elevated subway with stations (ie: NYC - 7 train)
- Some of my other NS, Conrail and LIRR engines are visible on the table
{Build update, the 10ft width was adjusted to 9.75 ft, had to fit/squeeze by wall to control pannel}
- First video is 1 minute running two trains, with MTH Z1000 conventional power
- Outer Black loop is running the Susquehanna - Susie Q (MTH - Dash-8) with my Lionel legacy quality cars
- Inner Blue loop running Erie & Lackawanna (MTH - RS3) with LIRR coaches
- Last three videos combined is approx. 8 minutes with same details as above (Web file size upload issue required breakup of video)
- Outer Black loop is running the Susquehanna - Susie Q (MTH - Dash-8)
- Inner Blue and incline to upper Green loop is running the Erie & Lackawanna (MTH - RS3)
- Inner train goes up/down the incline to elevated Green loop.
- I added some talking points added on the last three videos
Note: Any help needed on layout design pls send comment below or find me on Ebay.
Lastly, Shout-out to Atlas O ( Hillside, NJ !!) for purchasing old MTH tooling and rights for an MTH lifeline, there is hope yet..
